3편까지는 공정 전체나 작업자-기계 단위를 다뤘다면, 이번 편은 훨씬 더 미시적인 단위로 내려갑니다. 사람의 손동작 하나하나를 분석하는 동작연구, 그리고 여기서 나온 동작경제의 원칙을 다룹니다. 1편에서 소개했던 길브레스의 "서블릭"이 실제로 어떻게 쓰이는지 확인할 수 있는 편입니다.
동작분석이란
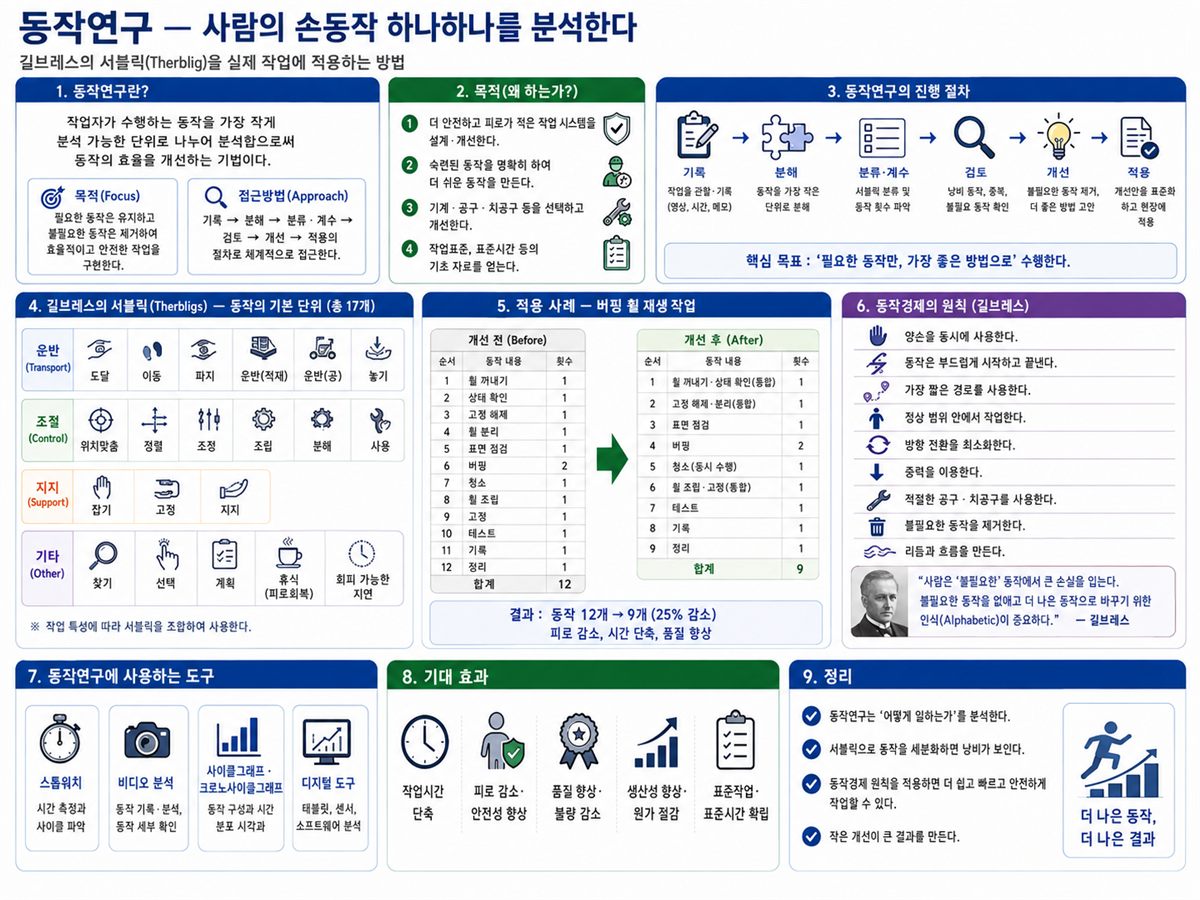
동작분석은 작업자의 행위나 작업 동작을 분해 가능한 최소 단위로 나누어 세부 분석함으로써, 동작 자체의 효율성을 개선하는 활동입니다.
목적
피로가 적은 안전한 작업 시스템을 설계·개선한다
숙련된 동작을 해명해서 더 쉬운 동작을 만든다
기계·치공구를 선택하고 개선한다
작업표준, 표준시간의 기초자료를 얻는다
종류
동작분석은 크게 서블릭 분석과 필름/비디오 분석(메모모션 스터디, 마이크로모션 스터디, VTR 분석)으로 나뉘고, 이 외에도 사이클 그래프 분석, 크로노 사이클 그래프 분석, 스트로보 사진 분석, 아이 카메라 분석, SIMO 차트 분석 등이 있습니다.
서블릭(Therblig) 분석
1편에서 소개했듯, 길브레스는 인간의 작업이 몇 가지 기본동작 요소의 결합으로 이뤄진다고 보고, 이 기본 동작요소를 18종류(현재는 17종류)로 정리해서 "서블릭"이라 불렀습니다.
목적
작업 구성을 더 상세히 관찰한다
서블릭의 유용도 분류에 따라 개선점을 지적한다
Motion mind(동작 단위로 작업을 관찰하는 자세)를 체득하는 데 유용하다
특징
작업을 기본 동작요소로 분류해서, 서블릭의 유용도로부터 작업 구성 내용을 체크하고 개선점을 얻습니다. 서블릭은 목적 분류로 쓰이며, 정신분석적 성격이 강해서 정량적으로는 그다지 유효하지 않다는 특징이 있습니다. 간단한 기호와 색으로 표시합니다.
서블릭 기호의 3가지 분류
제1류: 일을 하는 데 꼭 필요한 서블릭 — 쥐다(G), 빈손이동(TE), 운반(TL), 내려놓기(RL), 조립(A), 분해(DA), 사용(U)
제2류: 작업을 보조하는 서블릭 — 찾음(Sh), 선택(St), 바로놓기(P), 준비함(PP), 검사(I), 계획(Pn). 개선을 통해 가능하면 배제한다.
제3류: 일을 하지 않는 서블릭 — 잡고있기(H), 불가피한 지연(UD), 피할 수 있는 지연(AD), 휴식(R). 동작 개선의 첫 단계는 이 서블릭들을 제거할 수 있는지 검토하는 것이다.
색깔로도 성격을 구분합니다 — 빨강/파랑은 끝맺음 동작, 초록은 움직임이 큰 동작, 회색/검정은 주저하는 동작, 노랑/오렌지는 지체 동작, 갈색은 생각이 수반되는 동작을 나타냅니다.
효율적인 서블릭(1류)은 작업 진행과 직접 연관되어 시간을 단축시킬 수는 있지만 완전히 배제하기는 어렵고, 비효율적인 서블릭(2류·3류)은 작업분석과 동작경제원칙을 적용해서 제거하는 게 목표입니다.
동작경제의 원칙 (Principles of Motion Economy)
길브레스가 인체의 동작 능력을 연구해서 창안한 이 원칙에, 이후 R.M. Barnes, H.B. Maynard, 독일 작업연구연맹(REFA) 등이 계속 보완을 더했습니다. 크게 세 그룹으로 나뉩니다.
① 인체 사용에 관한 원칙
두 손의 동작은 같이 시작하고 같이 끝나도록 한다. 휴식시간을 제외하면 양손이 동시에 쉬지 않도록 하고, 두 팔은 서로 반대 방향으로 대칭적으로 움직이게 한다. 한 손으로 잡고 다른 손으로 작업하는 건 바람직하지 않다 — 작업장 양쪽에 같은 작업을 배치해서 양손이 대칭적으로 움직이게 하면, 팔의 균형이 잡혀 정신적·신체적 부담이 줄어든다.
손과 신체의 동작은 가장 낮은 동작등급을 사용한다. 손동작은 어디를 축으로 움직이느냐에 따라 5등급으로 나뉩니다.
등급
축
관련 신체 부위
1
손가락관절
손가락
2
손목
손가락, 손
3
팔꿈치
손가락, 손, 팔뚝
4
어깨
손가락, 손, 팔뚝, 상부
5
허리통
손가락, 손, 팔뚝, 상부, 몸통
상위 등급은 하위 등급의 모든 동작을 수반하므로, 상대적으로 낮은 등급이 힘이 덜 듭니다. 다만 무조건 손가락 동작만 쓰라는 뜻은 아닙니다 — 한 연구에 따르면 오히려 등급3(팔꿈치)이 손가락 동작보다 정확하고 덜 피로하며 민첩해서, 경노동에서는 등급3이 가장 바람직합니다. 사이클이 매우 짧은 반복작업에서는 손목이나 팔꿈치를 축으로 하는 동작이 어깨나 손가락보다 낫습니다.
가능한 관성(momentum)을 이용해서 작업하되, 억제해야 할 때는 최소화한다. 관성이 필요한 순간적인 큰 힘을 쓰는 작업이라면 관성이 최대일 때 동작이 일어나도록 유의하고, 관성이 바람직하지 않은 경우에는 중량을 줄이고 동작 거리도 짧게 해서 속도를 낮춥니다.
손 동작은 부드럽고 연속적으로, 방향이 갑자기 크게 바뀌는 직선동작은 피한다. 연필을 옮기는 간단한 동작을 실험해보면, 운반거리(5, 10, 15인치)와 무관하게 시간의 15~25% 정도가 방향 전환에 소요됐습니다. 즉 방향을 급격히 바꾸면 시간도 더 걸리고 작업자도 쉽게 피로해집니다.
탄도동작(ballistic movement)이 제한되거나 통제된 동작보다 더 신속·용이·정확하다. 통제된 동작은 연필로 글을 쓸 때처럼 반대 방향 근육이 계속 힘을 겨루는 동작이고, 탄도동작은 교향악단 지휘자의 지휘봉이나 목수가 망치질할 때처럼 동작 초기에만 근육이 작용하고 나머지 시간은 이완된 상태로 움직이는 동작입니다. 탄도동작이 힘차면서도 덜 피로하고, 신속하고 정확하며, 근육 경련도 덜 일으킵니다.
가능하면 쉽고 자연스러운 리듬이 생기도록 작업을 배치한다. 연탄 배달 작업(한 사람이 던지고 다른 사람이 받아 쌓는)처럼, 리듬이 있는 작업은 부드럽고 연속적으로 수행됩니다. 작업장·공구·자재의 배치를 잘해주면 이런 리듬감을 만들어낼 수 있고, 이는 정신적 피로를 줄여줍니다.
눈의 초점을 모아야 하는 작업은 가능하면 없애고, 불가피하면 두 지점 간 거리를 짧게 한다. 눈이 작업을 유도해야 하는 경우, 눈의 이동 거리가 짧을수록 작업 속도가 빨라집니다.
② 작업장 배치에 관한 원칙
모든 공구·재료는 자기 위치에 있도록 한다. 위치가 고정되어 있으면 작업자가 동작을 습관적으로 빠르게 할 수 있어 정신적 부담이 줄어듭니다. 목표물을 눈으로 보지 않고 느낌으로 잡을 수 있으면, 눈의 초점을 미리 다음 작업 장소에 맞춰둘 수 있어 능률이 올라갑니다.
공구·재료·제어장치는 사용 위치 가까이에 둔다. 이때 기준이 되는 게 정상작업영역과 최대작업영역입니다.
정상작업영역: 팔을 몸통에 자연스럽게 붙인 채 손으로 그릴 수 있는 부채꼴 원호 안쪽 지역. 단순 조립작업에 적합
최대작업영역: 어깨를 축으로 팔을 휘두를 때 그려지는 부채꼴 원호 안쪽 지역. 이 영역 바깥에서 양손 작업을 하면 자세를 많이 구부리게 되어 쉽게 피로해짐
중력이송 원리를 이용한 부품상자나 용기로 부품을 사용 장소 가까이 보낸다. 바닥이 경사진 부품상자를 쓰면 중력으로 부품이 사용 장소까지 미끄러져 내려와서 상자 속을 뒤적이는 수고를 덜 수 있습니다. 실험에 따르면 용기 앞 가장자리를 날카롭게 만든 것보다 둥글게 한 게 낫고, 평평한 면 위 물건을 집을 땐 손이 멈추지 않고 움직이면서 집을 수 있는 형태가 더 우수했습니다.
가능하면 낙하식 운반(drop delivery) 방법을 쓴다. 가공이 끝난 위치에서 부품을 놓아주면 중력으로 저절로 원하는 장소에 도달하도록 작업장을 배치하면, 시간도 절약되고 양손이 동시에 다음 사이클을 바로 시작할 수 있어 작업 리듬도 깨지지 않습니다.
공구·재료는 작업 동작이 원활하게 이어지도록 위치를 정한다. 같은 동작이라도 작업 사이클의 어느 시점에 위치하느냐에 따라 소요시간이 달라집니다. "빈손이동" 다음이 "고르는 동작"인지 미리 놓인 물건을 바로 잡는 동작인지에 따라 시간이 다르고, "운반" 다음이 "바로놓기"면 운반 시간이 더 느려집니다. 동작이 일어나는 순서를 감안해서 재료·도구 위치를 배치해야 합니다.
작업자가 잘 보면서 작업할 수 있도록, 적절한 조명을 갖춘다. 적정한 조도, 눈부시지 않는 조명색, 올바른 빛의 방향이 필요합니다. 목표물을 잘 볼 수 있는지는 밝기, 배경과의 대비, 크기, 허용 시간, 눈으로부터의 거리, 그리고 산만함·피로·눈부심 같은 요인에 좌우됩니다.
작업자가 자세를 임의로 바꿀 수 있도록 작업대와 의자 높이를 조정 가능하게 한다. 자세가 바뀌면 혈액순환이 좋아지고 근육 부위별로 피로 회복이 되기 때문입니다. 작업대 높이는 보통 팔꿈치 아래 1~3인치, 정밀작업은 조금 더 높게 잡습니다.
③ 공구 및 설비 디자인에 관한 원칙
치구나 페달 장치로 양손이 다른 일을 할 수 있게 한다. 손으로만 조작하는 공구를 발로도 작동 가능하게 설계하면, 두 손을 다른 작업에 쓸 수 있습니다. 펀치 프레스 작업에서 5가지 페달 형태의 효율을 비교한 연구에 따르면, 가장 좋은 페달과 가장 나쁜 페달 사이에 소요시간이 34%나 차이 났습니다.
공구의 기능을 결합해서 사용한다. 두 가지 기능을 가진 공구(장도리, 양측렌치, 지우개 달린 연필, 송수화기가 결합된 전화기 등)를 쓰면, 매번 공구를 내려놓고 다른 걸 집는 것보다 빠릅니다.
공구와 자재는 사용하기 쉽게 미리 위치를 잡아준다(pre-position). 사용이 끝난 공구가 원위치로 쉽게 돌아가고, 공구를 잡은 상태 그대로 사용할 수 있게 디자인합니다.
각 손가락의 능력에 맞게 작업량을 분배한다. 선호하는 손(오른손잡이면 오른손)은 다른 손보다 10% 정도 빈손이동 동작을 신속하게 수행하고, 목표물을 잘못 겨냥하는 비율도 더 낮습니다(7% 대 12%). 흥미롭게도, 기존 영문 타자기는 손가락의 상대적 능력을 무시한 설계라 왼손에 오른손보다 47.7% 더 많은 작업량이 부과되어 있다는 연구 결과가 있습니다. 이를 개선한 새 키보드가 나왔지만, 기존 타자기에 익숙해진 사람들이 바꾸길 꺼려 보편화되지 못했다고 합니다.
레버, 핸들, 제어장치는 작업자가 자세를 크게 바꾸지 않아도 조작하기 쉽게 배열한다. 연구에 따르면 레버는 높이 780mm에 부착해서 서서 움직이는 방법이, 핸들은 1,080mm 높이에 고정하는 방법이 가장 효율적이라고 알려져 있습니다.
작업자공정도(양손동작분석표)
동작경제의 원칙을 실제로 적용해서 작업을 분석하는 도구가 작업자공정도(Operator Process Chart)입니다. 다중활동분석표의 한 유형으로, 양손의 움직임을 관찰 대상으로 하기 때문에 양손동작분석표(Left and Right Hand Process Chart)라고도 부릅니다.
목적
양손 동작의 균형을 유지시켜 피로를 감소시킨다
비효율적인 동작을 제거·감소시킨다
효율적인 동작이라도 동작시간을 줄인다
새로운 작업자에게 작업방법을 가르치는 데 사용한다
개선 전후의 차이를 명백히 보여준다
작성 요령
대부분의 수작업 분석에서는 뒤에 소개할 SIMO 차트보다 작업자공정도만으로 충분합니다. 17개의 서블릭 중 다음 8개만으로 작성하면 편리합니다: 빈손이동, 쥐기, 운반, 바로놓기, 사용, 내려놓기, 지연, 잡고있기. 불가피한 지연·피할 수 있는 지연·휴식은 하나로 묶어 "지연(D)"으로 표시합니다.
작성 순서는 대상 작업 파악 → 작업장 스케치 → 한 손의 작업 내용 기록 → 다른 손 분석입니다. 필요하면 스톱워치로 각 동작의 소요시간도 측정합니다. 완성된 후에는 먼저 지연(D)과 잡고있기(H) 부분을 제거할 수 있는지 검토합니다.
SIMO 차트: 정밀한 미세동작연구
대상 작업의 사이클이 매우 짧고 반복성이 큰 수작업이라면, 작업자공정도보다 더 정밀한 SIMO 차트(Simultaneous Motion Chart)를 씁니다. 작업자공정도의 기본 형태를 유지하면서 동작시간·동작등급 정보까지 함께 표시하는 정밀 차트입니다.
미세동작연구(Micro Motion Study)
필름이나 비디오테이프로 작업자의 동작과, 작업대에 설치한 마이크로크로노미터(microchronometer)의 시계 바늘을 동시에 촬영한 뒤, 한 프레임씩 서블릭 단위로 분석하는 연구입니다. 비용이 많이 들기 때문에 사이클 시간이 짧고 반복성이 커서 경제적 효과가 클 것으로 기대되는 작업에 주로 씁니다. 다리 동작, 몸통 동작, 눈의 움직임 분석에도 쓰이고, 신체장애자의 작업 방안을 모색할 때도 활용됩니다.
연구 절차의 특이한 점: 스톱워치 표준시간 연구에서는 평균 숙련도의 작업자를 대상으로 하지만, 미세동작연구는 가능하면 최고로 숙달된 작업자 두 명을 선발합니다. 이유는 이런 작업자들이 동작경제원칙에 위배되는 동작을 잘 하지 않고, 자신감이 있어 촬영 시에도 동작이 자연스럽고, 연구를 잘 이해하고 협조적일 가능성이 높기 때문입니다. 두 명을 대상으로 하면 각자의 작업 방법 중 더 나은 부분을 골라 취사선택할 수 있어 개선 가능성도 커집니다.
절차를 정리하면: 숙련된 작업자 2명의 작업을 촬영 → 프레임별로 SIMO 차트에 서블릭과 시간치 기록 → 동작경제원칙과 서블릭 개선사항 검토해서 작업방법 개선 → 개선된 방법을 표준화해서 작업자에게 교육 → 개선된 방법을 다시 촬영해서 검증.
측정 시에는 빈손이동(TE) 서블릭을 분석의 시작점으로 잡고 프레임 계수기를 원점으로 되돌립니다. 내려놓기(RL) 서블릭이 한 프레임만으로 수행되는 가장 짧은 서블릭이기 때문에, 이를 기준으로 SIMO 차트의 시간 눈금 크기를 0.002~0.005분으로 잡습니다.
미세동작연구의 장점
작업 내용을 서블릭으로 표현하기 때문에 작업 시간의 비교와 추정에 유용하다
작업자가 SIMO 차트를 보면서 이상적인 작업동작을 단시간에 습득할 수 있다
서블릭이라는 미세 단위로 분석하기 때문에, 한 작업을 개선한 경험을 다른 작업에도 응용하기 쉽다
연구가 숙달되면 작업 진행을 눈으로 관찰하는 것만으로도 서블릭 단위 해석이 가능해져, 작업개선 능력이 크게 늘어난다
메모모션 분석(Memomotion Analysis)
미세동작연구와는 다른 접근으로, 매우 저속으로 작업 진행 상황을 촬영한 뒤 분석하는 기법입니다. 보통 촬영 속도가 16FPS(초당 프레임)인데, 메모모션은 1분에 60~100프레임 속도로 촬영합니다.
주요 용도
사이클이 긴 작업
사이클이 불규칙적인 작업
조작업
여러 설비를 쓰는 작업
설비 배치의 개선
워크샘플링 등 장기간에 걸친 동작연구
장점
조작업처럼 서로 연관되어 발생하거나 불규칙적으로 발생하는 상황을 정확히 기록할 수 있고, 동작 내용과 시간을 동시에 파악할 수 있다
미세동작연구 대비 필름 비용이 6% 정도면 충분하다 — 영사 속도를 16fps로 돌리면 1시간의 작업 내용을 4분 만에 파악할 수 있다
사용 사례: 치과 치료실
치과 치료실에서 의사와 보조원의 움직임을 메모모션으로 분석한 사례가 있습니다. 치료실 구석에 촬영기를 매달아 일정 기간 촬영한 뒤, 필름을 분석해서 두 사람의 이동 경로를 그렸습니다(실선은 의사, 점선은 보조원). 원래 의사 혼자 치료하도록 설계된 치료실에서 두 사람이 팀으로 일하다 보니, 걸어다니는 데 상당한 에너지와 시간이 낭비되고 있다는 게 드러났습니다.
이 결과를 바탕으로 설비 배치를 개선하자 두 사람의 움직임이 훨씬 작아졌습니다. 이렇게 움직임의 빈도를 그림으로 나타낸 차트를 이동빈도표(Trip Frequency Diagram)라고 부릅니다.
정리하면, 동작연구는 IE가 다루는 단위 중 가장 작습니다. 공정 전체(2편)에서 작업자-기계 배치(3편)로, 다시 손끝 하나의 움직임(4편)으로 계속 렌즈를 좁혀온 셈입니다. 그리고 이 미세한 관찰이 결국 "작업 속도가 왜 사람마다 다른가", "왜 어떤 작업은 유독 피곤한가" 같은 질문에 구체적인 답을 줍니다. 다음 편(5편)에서는 다시 스케일을 조금 넓혀서, 스톱워치 시간연구의 실무 절차와 워크샘플링, 여유시간·피로 측정 같은 작업측정 기법을 다뤄보겠습니다.
Parts 1–3 dealt with the overall process flow and the worker-machine unit. This part zooms in much further — to the individual hand movement. We'll cover motion study and the principles of motion economy that came out of it. This is where Gilbreth's "therbligs," introduced in Part 1, come into actual use.
What Is Motion Analysis?
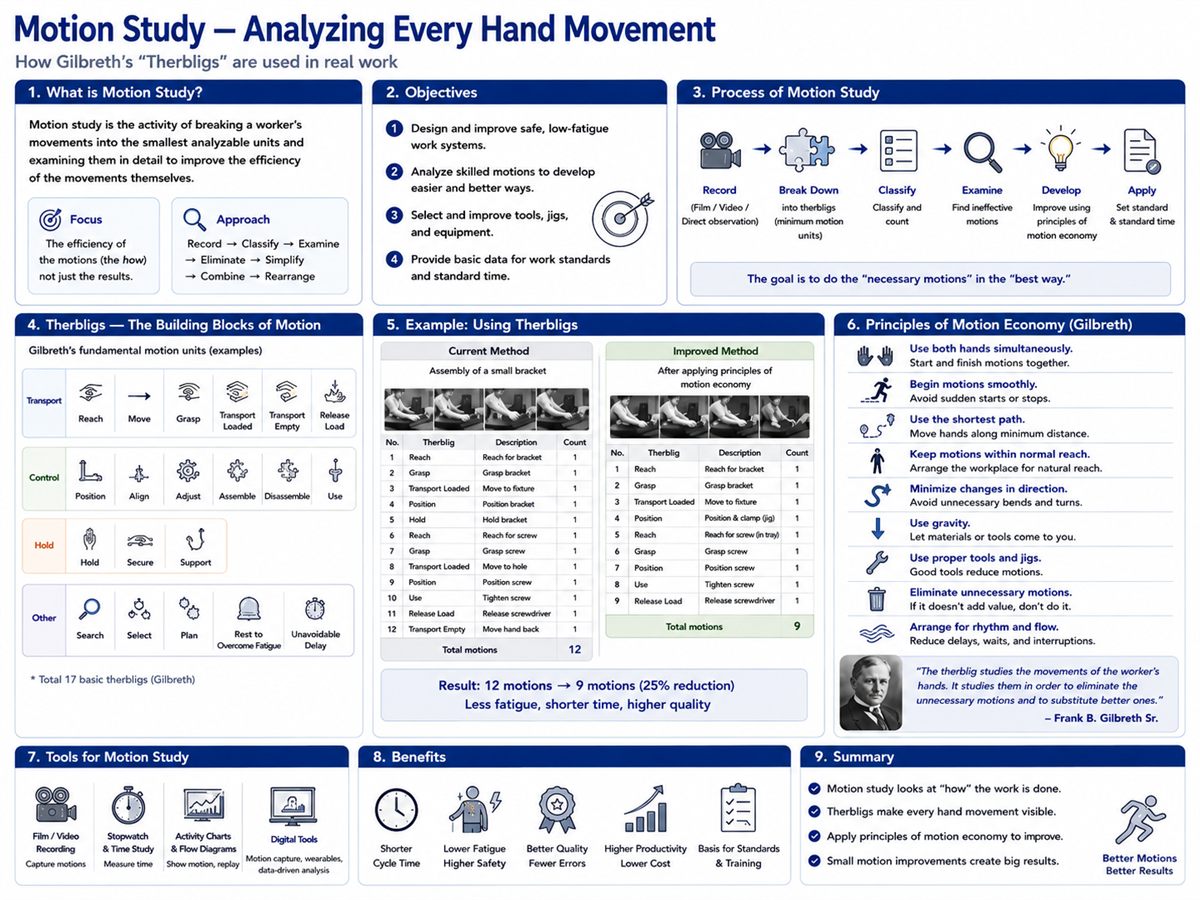
Motion analysis breaks a worker's actions and movements down into the smallest decomposable units, then examines them in detail to improve the efficiency of the motion itself.
Objectives
Design and improve safe work systems that minimize fatigue
Identify what skilled operators do differently, then make those methods easier to replicate
Select and improve machines, jigs, and tools
Collect baseline data for work standards and standard time
Types of Motion Analysis
Motion analysis falls into two broad categories: therblig analysis and film/video analysis (memomotion study, micro motion study, video analysis). Additional techniques include cyclograph analysis, chronocyclograph analysis, stroboscopic photography, eye camera analysis, and SIMO chart analysis.
Therblig Analysis
As introduced in Part 1, Gilbreth observed that any human work task is a combination of a fixed set of basic motion elements. He identified 18 of them (now 17) and called them "therbligs" — his name spelled backwards.
Objectives
Observe work content in greater detail
Identify improvement opportunities based on each therblig's usefulness classification
Build "motion mind" — the habit of observing work at the motion-element level
Characteristics
Therbligs classify work into basic motion elements and use their usefulness ratings to surface improvement targets. They are inherently qualitative — strong for diagnostic purposes but not particularly suited for quantitative measurement. Each therblig has a standard symbol and color.
Three Classes of Therbligs
Class 1 — Therbligs that directly accomplish work: Grasp (G), Transport Empty (TE), Transport Loaded (TL), Release Load (RL), Assemble (A), Disassemble (DA), Use (U)
Class 2 — Therbligs that support work: Search (Sh), Select (St), Position (P), Pre-position (PP), Inspect (I), Plan (Pn). These should be eliminated through improvement where possible.
Class 3 — Therbligs that do no work: Hold (H), Unavoidable Delay (UD), Avoidable Delay (AD), Rest (R). The first step of motion improvement is always asking: can these be removed?
Color coding also signals character — red/blue for terminal motions, green for large-movement motions, gray/black for hesitation, yellow/orange for delay, brown for motions involving thought.
Class 1 therbligs can be shortened but rarely eliminated entirely. Class 2 and 3 therbligs are the primary improvement targets — the goal is to eliminate them through work analysis and the principles of motion economy.
Principles of Motion Economy
Gilbreth originated these principles from his study of human motion capabilities. R.M. Barnes, H.B. Maynard, and Germany's REFA institute added to them over the decades. They fall into three groups.
① Principles for Use of the Human Body
Both hands should begin and end motions simultaneously. Except during rest, neither hand should be idle while the other works. The two arms should move in opposite symmetric directions. Holding with one hand while working with the other is undesirable — positioning identical operations on both sides of the workspace and working symmetrically reduces both mental and physical strain.
Use the lowest motion class possible. Hand motions are classified by their pivot point into five grades:
Grade
Pivot
Body parts involved
1
Finger joints
Fingers
2
Wrist
Fingers, hand
3
Elbow
Fingers, hand, forearm
4
Shoulder
Fingers, hand, forearm, upper arm
5
Trunk
Fingers, hand, forearm, upper arm, torso
Higher grades include all lower-grade motions and require more effort. But "lower is always better" is not the rule — one study found Grade 3 (elbow pivot) to be more accurate, less fatiguing, and more agile than pure finger movements. For light repetitive work, Grade 3 is often optimal. Very short-cycle repetitive tasks are better served by wrist or elbow pivots than by shoulder or finger-only motions.
Use momentum where work requires it; minimize it where it must be arrested. When a task requires a sudden burst of force, time the motion so that momentum is at its peak when force is needed. Where momentum is unwanted, reduce weight and shorten travel distance to lower velocity.
Smooth, continuous curved motions are preferable to straight-line motions with sharp direction changes. Experiments moving a pencil across distances of 5, 10, and 15 inches found that 15–25% of total time was consumed by direction changes — regardless of distance. Abrupt direction changes waste time and fatigue workers faster.
Ballistic movements are faster, easier, and more accurate than restricted or controlled movements. A controlled movement — like writing with a pencil — requires opposing muscle groups to compete continuously. A ballistic movement — like a conductor's baton or a carpenter's hammer stroke — uses muscle only at the start, then releases into relaxed motion. Ballistic movements are more powerful yet less fatiguing, faster, more accurate, and less prone to muscle cramps.
Arrange work so that an easy, natural rhythm develops. Work with rhythm — like a two-person relay throwing and stacking — flows smoothly and continuously. Good layout of workspace, tools, and materials creates this rhythm and reduces mental fatigue.
Eliminate eye fixation where possible; where unavoidable, minimize the distance between fixation points. When eyes must guide the work, shorter eye travel distance means faster work.
② Principles for Workplace Layout
All tools and materials should have a fixed, designated place. Fixed positions let workers develop habitual motions that execute quickly without mental effort. When an object can be grasped by feel without looking, the eyes can be directed to the next work point in advance — raising efficiency.
Tools, materials, and controls should be located close to the point of use. Two reference zones matter here:
Normal work area: The arc swept by the hand with the upper arm naturally at the side. Suitable for simple assembly work.
Maximum work area: The arc swept by the hand with the arm fully extended from the shoulder. Working beyond this zone requires the worker to lean and bend, causing rapid fatigue.
Use gravity-feed bins or chutes to bring parts close to where they are used. A tilted bin lets gravity slide parts to the front edge, eliminating rummaging. Research found that a rounded bin edge outperforms a sharp one, and that shapes allowing continuous-motion pickup (without hand stopping) outperform flat surfaces.
Use drop delivery where possible. If releasing a finished part allows it to fall by gravity to the next location, both hands are free to begin the next cycle immediately — saving time and preserving work rhythm.
Position tools and materials so that motions flow smoothly in sequence. The same motion takes different amounts of time depending on where it falls in the work cycle. A "transport empty" followed by "select" takes longer than one followed by a pre-positioned object. A "transport loaded" ending in a "position" move slows the transport itself. Tool and material placement must account for the sequence of motions that surround them.
Provide adequate, well-directed lighting so workers can see clearly. Adequate illuminance, glare-free color, and correct light direction are all required. Visibility depends on brightness, contrast with the background, target size, allowable viewing time, viewing distance, and distraction, fatigue, and glare factors.
Provide adjustable-height workbenches and chairs so workers can freely alternate posture. Changing posture restores circulation and allows different muscle groups to recover. Worktop height is generally set at 1–3 inches below the elbow, slightly higher for precision work.
③ Principles for Tool and Equipment Design
Use jigs and foot pedals to free both hands for other work. Redesigning a hand-operated tool for foot actuation leaves both hands available. A study comparing five pedal designs for a punch press found a 34% time difference between the best and worst design.
Combine tool functions. A claw hammer, double-ended wrench, pencil with eraser, or handset telephone all perform two functions in one tool — faster than picking up and setting down two separate tools.
Pre-position tools and materials for easy pickup. Design tools to return to their ready position easily after use, and so that gripping them in their resting position immediately puts them in operating position.
Distribute work load in proportion to each finger's capability. The preferred hand (right, for right-handed workers) performs transport-empty motions about 10% faster than the other hand, and mistargets about half as often (7% vs. 12%). Notably, the conventional English-language typewriter was designed without regard to finger capability — one study found it places 47.7% more work on the left hand than the right. An improved keyboard layout was developed, but users already habituated to the old layout resisted switching, and it never became widespread.
Arrange levers, handles, and controls so they can be operated without awkward posture changes. Research found that levers attached at 780mm height operated while standing are most efficient; handles fixed at 1,080mm height are optimal for their type.
Operator Process Chart (Left and Right Hand Chart)
The Operator Process Chart is the practical tool for applying the principles of motion economy. It is a form of multiple activity chart that tracks both hands simultaneously — also called the Left and Right Hand Process Chart.
Objectives
Balance left and right hand motion to reduce fatigue
Eliminate or reduce inefficient motions
Shorten time even for motions that are already efficient
Teach the correct work method to new workers
Make the difference between before and after improvement clearly visible
How to Construct One
For most manual work analysis, the operator process chart is sufficient — the SIMO chart is only needed when greater precision is required. Only 8 of the 17 therbligs are needed: Transport Empty, Grasp, Transport Loaded, Position, Use, Release Load, Delay, and Hold. Unavoidable delay, avoidable delay, and rest are all recorded as a single "Delay (D)."
Construction sequence: understand the target operation → sketch the workplace layout → record one hand's motions → analyze the other hand. Add stopwatch timings for each motion if needed. After completion, review whether Delay (D) and Hold (H) segments can be eliminated first.
SIMO Chart: Precision Micro Motion Study
When the operation cycle is very short and highly repetitive, the more precise SIMO Chart (Simultaneous Motion Chart) is used instead of the operator process chart. It retains the same basic format but adds motion timing and motion grade information.
Micro Motion Study
A camera films the worker's motions alongside a microchronometer mounted on the workbench — both in the same frame — and the footage is then analyzed frame-by-frame at the therblig level. The cost is high, so micro motion study is reserved for short-cycle, highly repetitive operations where the economic payback justifies it. It is also used for leg, torso, and eye movement analysis, and for finding work methods for workers with physical disabilities.
A notable procedural difference: while stopwatch time study deliberately targets workers of average skill, micro motion study selects the two most highly skilled available workers. The reasons: skilled workers tend to avoid motions that violate motion economy principles naturally; their confidence keeps their motions natural on camera; and they understand and cooperate with the research. Studying two workers allows analysts to pick the best elements from each person's method.
Procedure summary: film two skilled workers → record therbligs and time values frame-by-frame on the SIMO chart → review for motion economy and therblig improvement → standardize the improved method and train workers → film again to verify.
Transport Empty (TE) is used as the starting point of analysis, with the frame counter reset to zero. Release Load (RL) — requiring only a single frame — is the shortest therblig, so it sets the time scale: SIMO chart time divisions are typically 0.002–0.005 minutes.
Advantages of Micro Motion Study
Expressing work in therbligs makes time comparison and estimation straightforward
Workers can study the SIMO chart to learn the ideal motion sequence in a short time
Analyzing at the therblig level makes it easy to transfer improvement insights from one operation to another
As analysts become proficient, they can read therblig-level patterns by direct observation alone — greatly expanding their improvement capability
Memomotion Analysis
Rather than filming at high speed for frame-by-frame analysis, memomotion takes the opposite approach: filming at very low speed. Standard filming is 16 fps; memomotion uses 60–100 frames per minute.
Primary Applications
Long-cycle operations
Irregular-cycle operations
Team (gang) operations
Multi-machine operations
Facility layout improvement
Long-duration motion studies including work sampling
Advantages
Accurately captures team operations and irregularly occurring events; records both motion content and time simultaneously
Film cost is roughly 6% of micro motion study — and playing back at 16 fps means one hour of work is reviewed in just four minutes
Case Study: Dental Clinic
A dental clinic filmed the movements of a dentist and assistant using memomotion. A camera mounted in the corner of the treatment room recorded a period of activity; the footage was then analyzed to trace both people's movement paths (solid line for the dentist, dashed for the assistant). The result revealed that a treatment room designed for solo practice was causing significant energy and time waste as two people navigated it as a team.
Rearranging the equipment layout based on the findings dramatically reduced movement for both. A chart mapping movement frequency in this way is called a Trip Frequency Diagram.
In summary, motion study works at IE's smallest unit of analysis. From the full process (Part 2) to the worker-machine interaction (Part 3) to the individual hand movement (Part 4), the lens has been narrowing steadily. At this scale, IE can give concrete answers to questions like "why do work speeds vary so much between workers?" and "why does this particular job leave people so tired?" In Part 5, the scale widens again — to the practical procedures of stopwatch time study, work sampling, and fatigue and allowance measurement.
댓글Comments