[생산관리] ZERO 준비교체(SMED) 추진 매뉴얼 — 화장품 제조업 버전[Production Management] ZERO Changeover (SMED) Manual — Cosmetics Manufacturing Edition
FREEWAYFREEWAY·2026년 8월 21일August 21, 2026·12분 읽기12 min read
원본 매뉴얼(프레스/사출 금형 중심)의 핵심 개념과 구성은 그대로 두고, 모든 예시를 화장품 제조 현장(충전·성형·배합·포장)에 맞게 바꾼 버전입니다.
1. 준비교체 개선의 필요성
1-1. 왜 준비교체 개선이 필요한가
공장에는 여전히 "경제로트"라는 사고방식이 뿌리 깊게 남아 있습니다. 준비 비용과 재고 비용의 총합이 최소가 되는 로트 크기로 생산하는 것이 가장 바람직하다는 논리입니다. 화장품 제조 현장에서도 흔히 "한 번 충전라인을 세팅했으면 그 제품을 최대한 많이 뽑아내는 게 이득"이라는 식으로 통용됩니다.
소품종 대량생산이 가능하던 시절에는 이 방법이 통했을지 모릅니다. 하지만 오늘날 화장품 산업은 다품종 소량, 단납기의 대표 업종입니다. 스킨케어 한 브랜드만 해도 용량·향·색상별로 수십 개 SKU가 존재하고, 인플루언서 협업이나 시즌 한정판처럼 소량·단기 생산 요청이 끊이지 않습니다.
경제로트 사고방식은 준비교체 비용이 일정하다고 가정하지만, 실제로는 준비교체 작업을 개선하면 이 비용을 계속 줄일 수 있습니다. 반대로 로트를 크게 유지하면 과잉생산·대기·재고·이동·불량 등 각종 낭비가 함께 커지고, 리드타임도 길어지며 물류 흐름 전체가 정체됩니다. 다품종 소량, 단납기, 고품질을 동시에 요구받는 화장품 제조 현장에서는 이것이 치명적인 약점이 될 수 있습니다.
그래서 충전·성형·배합 라인의 준비교체 시간을 짧게 만들어, 시장의 요구 변화에 유연하게 대응하는 노력이 필요합니다.
1-2. ZERO 준비교체 발상의 원점
1개당 작업시간 = 가공(충전)시간 + 준비교체시간 ÷ 로트 수
예를 들어 충전 작업 1개당 60초가 걸리고, 준비교체에 8시간(480분=28,800초)이 걸린다고 가정해봅시다.
로트 크기
준비교체시간
1개당 작업시간
100개
8시간
348초
1,000개
8시간
89초
10,000개
8시간
63초
100개
4시간
204초
1,000개
4시간
74초
10,000개
4시간
61.8초
100개
3분
61초
1,000개
3분
60.2초
10,000개
3분
60.02초
준비교체시간을 3분까지 줄이면, 로트 크기와 상관없이 1개당 작업시간이 거의 최소치(60초)에 수렴합니다. 로트를 키우지 않고도 원가를 낮출 수 있다는 것, 이것이 ZERO 준비교체 발상의 핵심입니다. 소량 주문이 잦은 화장품 OEM·ODM 공장일수록 이 발상의 효과가 큽니다.
2. 준비교체 작업의 개요
2-1. 준비교체 작업의 정의
준비교체 시간이란, 현재 제품의 생산이 끝났을 때부터 다음 제품의 양품이 나올 때까지의 시간입니다. 예를 들어 스킨 로션 A 제품 충전이 끝나고, 크림 B 제품의 첫 양품 충전이 완료되기까지의 전체 시간입니다.
이 시간은 다시 두 가지로 나뉩니다.
내준비 시간: 라인을 세워둔 상태에서만 할 수 있는 작업 시간 (예: 충전 노즐 탈부착, 성형 몰드 교체)
외준비 시간: 라인이 가동 중일 때 미리 준비할 수 있는 작업 시간 (예: 다음 제품 원료 계량, 용기·라벨 사전 준비)
화장품 충전라인의 준비교체 흐름을 예로 들면 다음과 같습니다.
전 제품(로션 A) 생산 완료 → 다음 제품 생산지시 접수 → 로션 A용 충전 노즐·호스 탈거 → 세척(CIP) → 크림 B용 충전 노즐·호스 장착 → 크림 B 원료·용기 반입 → 시험 충전 → 중량·점도 조정 → 양품 판정 → 크림 B 본생산 개시
예: 다음 제품의 원료 계량, 용기·캡 반입, 라벨 준비, 배합 레시피 설정값 사전 입력은 모두 라인을 세우기 전에 끝낼 수 있는 외준비 작업입니다.
처음 시도할 경우 보통 전체 준비교체 시간의 50%가 외준비로 전환됩니다.
STEP 3. 낭비 제거 개선
남은 내준비 작업(라인을 세워야만 할 수 있는 작업)에서 낭비를 제거합니다. 아래 "정석"에 따른 소개선만으로도 다시 50% 단축이 가능합니다.
STEP 4. 내준비의 외준비화
세밀한 작업 분석을 통해, 얼핏 내준비로 보였던 작업을 외준비로 옮깁니다.
예: 충전 노즐을 하나씩 교체하지 않고, 다음 제품용 노즐 세트를 미리 조립해 블록 단위로 준비해둡니다.
예: 온도 조정이 필요한 크림류는 다음 배치의 원료를 미리 예열해둡니다.
STEP 5. 조정의 배제
준비·교환·조정 세 가지 낭비 중 특히 고난도인 "조정"의 낭비를 철저히 제거합니다. 준비교체의 기계화·자동화를 검토하는 단계이며, 경영진의 의지가 시험되는 단계이기도 합니다.
예: 충전량 조정을 작업자 감각에 의존하지 않고, 레시피별 세팅값을 시스템에 저장해 원터치로 불러오는 방식으로 바꿉니다.
5. 준비교체 개선 STEP의 다른 예
8스텝 추진방법: ① 손실시간 파악 → ② TOP 결의표명 및 팀 편성 → ③ 중점분석 및 현장관찰 → ④ 3가지 낭비로 정리 → ⑤ 개선안 발상 → ⑥ 계획 작성 → ⑦ 개선 실시 → ⑧ 평가 및 수평 전개(타 라인 확산)
6스텝 추진방법: ① 개선팀 발족 → ② 준비교체 작업 분석 → ③ 낭비작업 도출 및 5S 낭비제거 → ④ 내준비의 외준비화 → ⑤ 내준비 개선 → ⑥ 외준비 개선
6. ZERO 준비교체 개선의 정석 8가지 — 화장품 제조 현장 적용
정석 1. 준비할 수 있는 것은 미리 준비하라
준비교체가 시작된 후 노즐이나 몰드를 찾고, 원료를 가지러 창고까지 다녀오는 낭비를 없애야 합니다. 필요한 것은 모두 라인 옆에 사전 배치해둡니다.
준비교체 전용 대차에 다음 제품용 노즐, 캡핑 헤드, 계량컵, 검사구를 미리 세팅해 라인 스위치를 끄기 전에 옆에 옮겨둡니다.
노즐·몰드·부자재의 "주소화"(보관 위치를 라벨링해 어디에 뭐가 있는지 즉시 알 수 있게 함)를 도입합니다.
청소나 이물 제거는 준비교체가 끝나고 라인이 다시 움직이기 시작한 후에 진행합니다.
5S를 철저히 하고, 점도가 높은 크림류는 사전 예열을 해둡니다.
정석 2. 손은 움직여도 좋으나, 발은 움직이지 마라
준비교체 중 작업자가 창고·자재실·타 라인을 오가며 걸어 다니는 시간이 의외로 큽니다.
준비교체 전용 대차와 전용 공구를 라인 바로 옆에 배치해, 손을 뻗으면 잡을 수 있게 합니다.
충전기 조작 판넬이 준비 위치에서 멀리 떨어져 있다면 근접 위치로 이동합니다.
1인이 노즐 교체, 세척, 시험충전을 순서대로 하는 대신, 2~3인이 구역을 나눠 병렬 작업으로 진행하면 시간이 절반 이하로 줄어듭니다.
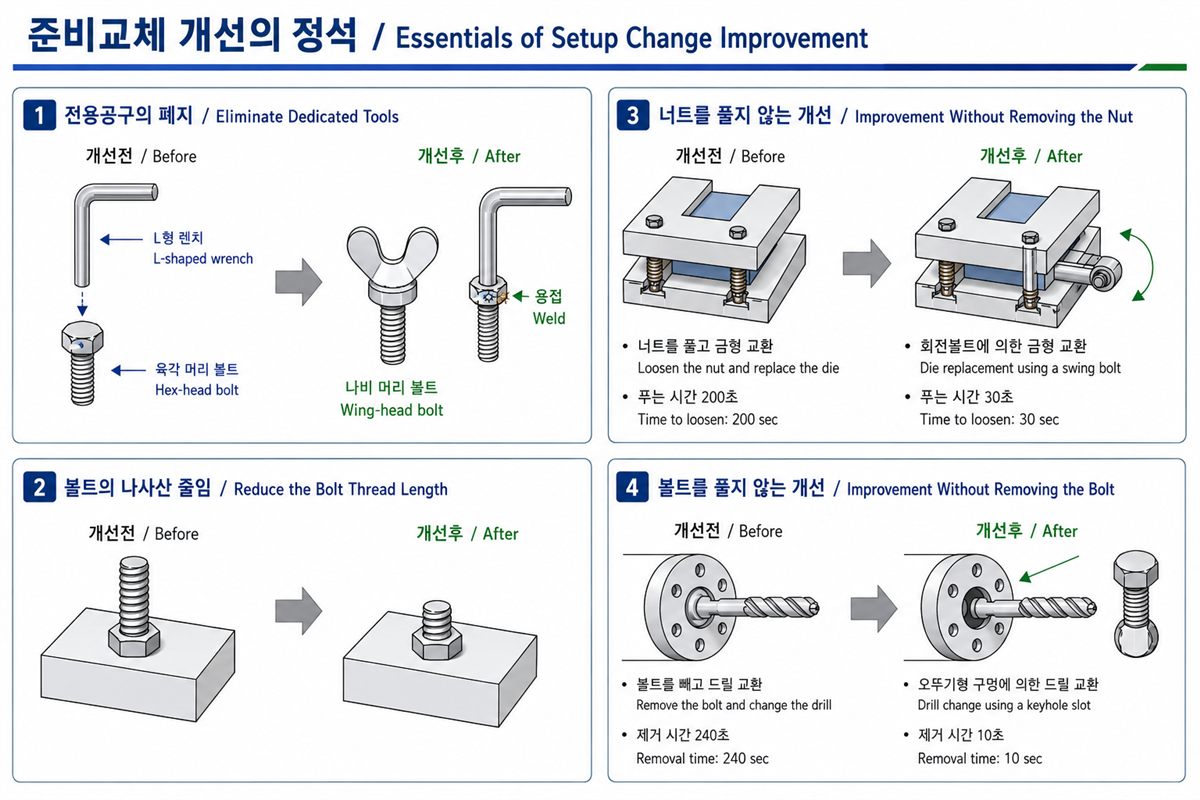
정석 3. 볼트는 풀어내지 마라
체결 볼트를 완전히 풀었다 다시 조이는 데는 나사산 12~20산 전부를 돌려야 하지만, 실제 체결력은 최후의 1회전에서 나옵니다. 나머지는 낭비입니다.
오뚜기형 구멍(장공), C형 와셔, 소너트 방식을 도입해 1회전만으로 탈착 가능하게 바꿉니다.
예: 충전 노즐 고정 볼트를 오뚜기형 구멍 방식으로 바꾸면 노즐 교체 시간이 크게 줄어듭니다.
정석 4. 볼트를 보면 철천지 원수라 생각하고, 철저하게 없애라
볼트의 기능은 체결력과 대략적인 위치 결정뿐입니다. 아예 볼트를 쓰지 않는 체결 방식을 찾아봅니다.
나비너트, 원터치 레버식 클램프, 오토 클램프로 대체합니다.
예: 캡핑 헤드나 충전 노즐 고정부를 레버 클램프 방식으로 바꾸면, 몽키 스패너 없이도 손으로 1초 만에 탈부착됩니다.
필요한 볼트 개수 자체를 줄이는 것도 방법입니다.
정석 5. 금형이나 치구의 기준은 움직이지 마라
충전 헤드의 중심 위치, 몰드의 높이 기준, 세팅부의 위치 같은 "기준"은 한 번 정하면 절대 움직이지 않아야 합니다. 기준 하나가 어긋나면 다른 모든 기준을 다시 맞춰야 하는 연쇄 조정이 발생합니다.
중심핀, 스페이스 블록으로 위치를 한 번에 맞춥니다.
용기(병) 사이즈가 다양해도 작업대 높이, 받침부 규격을 통일해 높이 조정을 없앱니다.
정석 6. 조정은 낭비, 베이스부는 움직이지 마라
기준(베이스)이 정확하지 않아서 발생하는 수정 작업이 바로 "조정"입니다. 베이스를 움직이는 대신, 끝단의 작은 부품(스페이서, 블록)만 조정합니다.
예: 충전 노즐의 체결 높이를 100mm로 통일하고 싶은데, 실제 용기 높이가 60·80·100·120mm로 제각각이라면 용기 자체(베이스)를 바꾸는 대신 스페이서 블록(20mm, 40mm)을 끼워 높이를 통일합니다. 큰 것(120mm)만 깎아냅니다. 이렇게 하면 클램프 교체 없이도 모든 용기를 동일한 방식으로 고정할 수 있습니다.
정석 7. 눈금을 보고 하는 조정작업은 모두 블록 게이지화 하라
충전량, 캡핑 압력 등을 눈금을 보며 시험 충전 → 측정 → 재조정을 2~3회 반복하는 것은 전형적인 낭비입니다.
제품별로 정해진 충전량에 맞춘 블록 게이지(스토퍼)를 만들어, 스토퍼에 닿을 때까지만 조정하면 한 번에 기준치가 나오도록 합니다.
1회의 시험충전·측정·조정은 허용하되, 2회째부터는 낭비로 간주하고 원인을 제거합니다.
정석 8. 끼워 맞추는 기준(스토퍼)이나 가이드를 설정하라
용기 위치를 눈대중으로 맞추거나, 여러 번 손으로 조정해가며 센터를 맞추는 것은 낭비입니다.
V자형 끼움 치구, 위치맞춤 스토퍼, 가이드 블록을 설치해 용기나 몰드를 "끼우기만 하면" 정위치가 되도록 만듭니다.
예: 성형 몰드를 볼스타(설비 받침대)에 올릴 때, 눈금을 보며 천천히 내리는 대신 스토퍼에 닿는 순간 위치가 자동으로 맞춰지도록 가이드를 설치합니다.
이 매뉴얼의 핵심은 결국 하나입니다. 준비교체 시간을 줄이면, 로트 크기를 키우지 않고도 원가와 리드타임을 동시에 줄일 수 있다. 화장품 산업처럼 다품종 소량, 빠른 트렌드 변화, 짧은 납기가 일상인 업종에서는 이 원칙이 특히 중요합니다. 충전 노즐 하나, 성형 몰드 하나를 바꾸는 몇 분의 시간을 줄이는 것이, 결국 신제품 대응 속도와 원가 경쟁력을 함께 끌어올리는 지렛대가 됩니다.
This is an adaptation of the original SMED manual (written around press and injection molding) with all examples rewritten for cosmetics manufacturing (filling, forming, compounding, packaging).
1. Why Changeover Improvement Is Necessary
1-1. The Problem with Economic Lot Thinking
Many factories still operate on the logic of the "economic lot" — producing at the batch size where the combined cost of changeover and inventory is minimized. On cosmetics filling lines, this often translates to the belief that "once the line is set up, we should run as much of that product as possible."
This may have made sense in the era of high-volume, few-SKU production. But cosmetics today is a quintessential high-mix, low-volume, short lead-time business. A single skincare brand can have dozens of SKUs across sizes, fragrances, and shades, and influencer collaborations or seasonal limited editions generate a steady stream of small-batch, short-run requests.
Economic lot thinking assumes changeover cost is fixed — but changeover cost can actually be driven lower through improvement. Keeping lot sizes large, by contrast, amplifies every form of waste: overproduction, waiting, inventory, unnecessary transport, and defects. Lead times stretch, and the entire logistics flow stagnates. In a business defined by high mix, low volume, tight deadlines, and tight quality requirements, this is a critical vulnerability.
Reducing changeover time on filling, forming, and compounding lines — so the operation can respond flexibly to market shifts — is therefore not optional.
1-2. The Core Idea Behind ZERO Changeover
Unit work time = processing (filling) time + changeover time ÷ lot size
Suppose filling one unit takes 60 seconds and the changeover takes 8 hours (480 min = 28,800 sec).
Lot size
Changeover time
Unit work time
100 units
8 hours
348 sec
1,000 units
8 hours
89 sec
10,000 units
8 hours
63 sec
100 units
4 hours
204 sec
1,000 units
4 hours
74 sec
10,000 units
4 hours
61.8 sec
100 units
3 min
61 sec
1,000 units
3 min
60.2 sec
10,000 units
3 min
60.02 sec
Reduce changeover to 3 minutes and the unit work time converges to nearly its minimum (60 sec) regardless of lot size. You can lower unit cost without increasing lot size. This is the central insight of ZERO changeover — and the more frequent the small orders, as in cosmetics OEM/ODM, the greater the impact.
2. Changeover Work: An Overview
2-1. Definition
Changeover time is defined as the time from the last good unit of the current product to the first good unit of the next product. For example: from the end of Lotion A filling to the first confirmed good unit of Cream B.
This breaks down into two types:
Internal setup (IED): Work that can only be done with the line stopped (e.g., nozzle removal and attachment, mold swap)
External setup (OED): Work that can be done while the line is still running (e.g., measuring out the next batch's ingredients, preparing containers and labels)
A typical changeover sequence on a cosmetics filling line:
Lotion A production ends → Next product order received → Lotion A nozzles and hoses removed → CIP cleaning → Cream B nozzles and hoses installed → Cream B ingredients and containers brought in → Trial fill → Weight and viscosity adjustment → Good-unit confirmation → Cream B full production starts
2-2. Types of Changeover Work
Type
Cosmetics manufacturing examples
Tooling / mold change
Container injection mold swap, lipstick / compact forming mold swap, filling nozzle and capping head swap
Recipe / parameter change
Mixer recipe change, per-product parameter update on precision dosing equipment, fine adjustment for color or fragrance change
Materials / packaging change
Container, cap, label, carton swap on the packaging line; bottle size change on the filling line
Pre-run preparation
Operator assignment, review of batch record and quality standard, CIP validation and cleaning, first-article inspection
2-3. Basic Directions for Improvement
Production scheduling improvement (optimizing run sequence by product family)
Design VE for parts commonality (standardizing container, cap, and nozzle dimensions)
Mechanization and automation of changeover (automated CIP, automated nozzle exchange)
Tooling and equipment redesign and standardization
Small-step kaizen on the floor
3. OEE and Changeover Loss
OEE = Availability × Performance × Quality
Availability: Reflects downtime losses from breakdowns, changeovers, nozzle/mold swaps, and startup yield losses
Performance: Reflects micro-stop, idling, and speed-loss losses
Quality: Reflects defect and rework losses
Changeover is the most prominent contributor to availability loss. Example calculation for a filling line:
Daily load time: 460 min; breakdown: 20 min; changeover/adjustment: 20 min; nozzle swap: 20 min → Operating time = 460 − 60 = 400 min
Availability = 400 ÷ 460 × 100 = 87%
This means 60 minutes — about 13% of the day — disappears into changeover-related losses. On a high-mix cosmetics line, this proportion can be considerably higher.
4. 5 Steps to Achieve ZERO Changeover
Step 1. Understand the Current State
Survey actual changeover times by line (filling, forming). "Exactly how long does nozzle replacement take?" is often a question no one can answer from data.
Form a cross-functional improvement team: production, quality, and maintenance.
Observe the shop floor, build activity logs and loss-time charts, and capture video for analysis.
Step 2. Separate Internal and External Setup
Identify everything currently done with the line stopped that could instead be done while it's still running.
Example: measuring out the next batch's ingredients, bringing in containers and caps, preparing labels, pre-entering recipe parameters — all external setup that can finish before the line ever stops.
On a first attempt, typically 50% of total changeover time shifts to external setup.
Step 3. Eliminate Waste from Internal Setup
Apply the eight fundamentals below to the work that genuinely requires the line to stop. Kaizen alone typically yields another 50% reduction.
Step 4. Convert Internal to External Setup
Deeper work analysis often reveals that tasks that appear to require line stoppage can be moved earlier.
Example: Instead of swapping filling nozzles one by one, pre-assemble the full nozzle set for the next product and stage it as a ready-to-install block.
Example: For cream formulas requiring temperature control, pre-heat the next batch's ingredients during the current run.
Step 5. Eliminate Adjustment
Of the three categories of waste — preparation, exchange, and adjustment — adjustment is the hardest to eliminate. This step explores mechanization and automation, and tests management commitment.
Example: Replace operator judgment on fill weight with a system where per-recipe setpoints are stored and recalled with one button press.
5. Alternative Step Frameworks
8-Step Method: ① Measure loss time → ② Top-level commitment and team formation → ③ Priority analysis and shop floor observation → ④ Categorize the three wastes → ⑤ Generate improvement ideas → ⑥ Draft improvement plan → ⑦ Implement improvements → ⑧ Evaluate and roll out horizontally to other lines
6-Step Method: ① Form improvement team → ② Analyze changeover work → ③ Identify waste and eliminate with 5S → ④ Convert internal to external setup → ⑤ Improve internal setup → ⑥ Improve external setup
6. Eight Fundamentals of ZERO Changeover Improvement
Fundamental 1. Prepare in Advance Everything That Can Be Prepared
Eliminate the waste of hunting for nozzles or molds, or walking to the warehouse for ingredients, after changeover has already started. Everything needed must be staged beside the line before the previous run ends.
Load the next product's nozzles, capping heads, measuring cups, and gauges onto a dedicated changeover cart and position it next to the line before the stop signal.
Implement "addressing" — label every storage location so the position of every tool and part is immediately visible.
Move cleaning and foreign-matter removal to after the line restarts, not during the changeover window.
Maintain rigorous 5S; pre-heat high-viscosity cream ingredients in advance.
Fundamental 2. Hands May Move — Feet Must Not
Walking time — to the warehouse, materials room, or another line — during changeover is surprisingly large.
Place dedicated changeover carts and tools immediately beside the line so everything is within arm's reach.
If the filling machine's control panel is far from the changeover position, relocate it.
Instead of one operator sequentially handling nozzle swap, CIP, and trial fill, split the tasks among two or three operators working in parallel — time drops by half or more.
Fundamental 3. Do Not Fully Remove Bolts
Fully removing and re-tightening a bolt requires turning through all 12–20 threads, but actual clamping force comes from the final turn. Everything before that is waste.
Switch to keyhole (slotted) holes, C-washers, or snap-nut designs that allow removal and reinstallation in a single turn.
Example: Converting filling nozzle mounting bolts to a keyhole slot design can dramatically reduce nozzle swap time.
Fundamental 4. Treat Every Bolt as an Enemy and Eliminate It Completely
A bolt's only functions are clamping force and rough positioning. Seek fastening methods that use no bolts at all.
Replace with wing nuts, one-touch lever clamps, or auto-clamps.
Example: Switching the capping head or nozzle mount to a lever-clamp design means removal and installation in one second by hand — no wrench required.
Reducing the number of bolts needed is itself an improvement.
Fundamental 5. Never Move the Reference Point of a Die or Fixture
The center position of the filling head, the height datum of a mold, the reference plane of a fixture — once set, these must never move. Shift one reference and every other reference requires re-adjustment in a cascade.
Use center pins and spacer blocks to achieve correct positioning in a single motion.
Standardize the table height and support dimensions across the full range of container sizes so height adjustment is eliminated entirely.
Fundamental 6. Adjustment Is Waste — Never Move the Base
Adjustment is what happens when the base reference is not precise enough. Instead of adjusting the base, adjust only the small end-piece (spacer or block).
Example: If the target nozzle mounting height is 100 mm but containers vary between 60, 80, 100, and 120 mm, fit spacer blocks (20 mm, 40 mm) under shorter containers and trim only the tallest (120 mm). The clamp itself never changes. Every container size is now handled the same way.
Fundamental 7. Convert Every Dial-Based Adjustment into a Block Gauge
Watching a gauge, running a trial fill, measuring, and adjusting again — repeated two or three times per changeover — is a classic waste pattern.
Build a block gauge (stopper) for each product's fill weight: the operator adjusts only until the stopper is contacted, and the correct setting is achieved in one pass.
Allow one trial fill–measure–adjust cycle, but treat a second cycle as a defect and eliminate its root cause.
Fundamental 8. Install Stoppers and Guides for Positive Location
Eyeballing container positions, or nudging them by hand until the center is found, is waste.
Install V-groove fixtures, locating stoppers, and guide blocks so that containers and molds snap into position simply by being placed — no further adjustment required.
Example: When loading a forming mold onto the bolster plate, install a guide so that the moment the mold contacts the stopper, position is automatically correct — no slow, gauge-watched descent needed.
The single core message of this manual is this: reduce changeover time and you reduce both cost and lead time without increasing lot size. In an industry like cosmetics — defined by high mix, fast trend cycles, and tight delivery windows — this principle matters more than in almost any other sector. Saving a few minutes on a nozzle swap or a mold change is the lever that simultaneously raises new-product responsiveness and cost competitiveness.
댓글Comments